




A professional four-tire rotation typically takes 15–30 minutes at a shop; a careful DIY rotation usually runs 30–45 minutes. The difference comes down to equipment, experience, and preparation. According to Bridgestone, post-rotation steps must include torquing lug nuts to manufacturer specification and rechecking tire pressures before you drive away.
Before you decide whether to DIY or book a shop, check these non-negotiables:
- Jack stands (not just a floor jack): Never work under a vehicle supported only by a hydraulic jack.
- Wheel chocks: Place them on the tires that stay on the ground.
- Torque wrench: Tighten lug nuts to the manufacturer’s spec, not by feel.
- Re-torque after 50–100 miles: Lug nuts can settle slightly after the first drive.
- ASE-certified technician: Recommended whenever you spot uneven wear, vibration, or suspect alignment issues.
Consumer Reports notes that rotation spreads wear evenly across all four tires, preserves grip, and gives a technician the chance to catch damage or inflation problems you might otherwise miss.
Key Takeaways
A professional tire rotation takes 15–30 minutes at a shop; a safe DIY rotation runs 30–45 minutes, and both require a post-drive re-torque at 50–100 miles to confirm lug nuts have fully seated.
| Point | Details |
|---|---|
| Shop vs. DIY time | Shops finish in 15–30 minutes; DIY typically takes 30–45 minutes with proper tools. |
| Safety non-negotiables | Always use jack stands, torque to manufacturer spec, and re-torque after 50–100 miles. |
| Pattern selection | Match the rotation pattern to your drivetrain; directional and staggered tires have strict limits. |
| Rotation interval | Rotate regularly following your owner’s manual and tire warranty guidance. |
| Kwik Kar Oil Change & Auto Care | ASE-certified technicians complete rotations with full inspection and transparent pricing. |
Table of Contents
- What does the fast tire rotation process look like, step by step?
- Which rotation pattern should you use?
- How long does each step take, and what does it cost?
- What do technicians inspect during a rotation, and when should you call a pro?
- Your quick tire rotation checklist
- What Kwik Kar recommends about fast rotations
- Kwik Kar Oil Change & Auto Care handles your rotation fast
- Sources
- FAQ
What does the fast tire rotation process look like, step by step?
A well-organized sequence cuts wasted motion and keeps the job safe. Follow this order every time.
- Check your owner’s manual first. Confirm your tire type (directional or non-directional), whether front and rear sizes differ (staggered), and whether your spare is full-size and rotation-eligible.
- Gather all tools before you start. Floor jack, four jack stands, breaker bar or impact wrench, torque wrench, lug socket, wheel chocks, tire pressure gauge, and a paint marker to label each tire’s current position.
- Park on a flat, hard surface. Engage the parking brake and chock the wheels that will stay on the ground.
- Loosen lug nuts while the tires are still on the ground. Break them loose (do not remove) before lifting. This prevents the wheel from spinning freely when you apply torque.
- Lift one axle at a time and place jack stands. Never rely on the jack alone. Position stands at the manufacturer’s designated lift points.
- Mark each tire’s position (e.g., “RF” for right front) with a paint marker before removal. This eliminates confusion during the swap.
- Swap tires according to your rotation pattern (see the next section for pattern selection).
- Hand-start all lug nuts before applying any torque. Cross-threading a lug nut is a slow, expensive mistake.
- Lower the vehicle to the ground, then torque in a star pattern to the manufacturer’s specification. Torquing in a star (or asterisk) sequence seats the wheel evenly against the hub.
- Check tire pressures on all four tires and adjust to the door placard spec.
- Re-torque after 50–100 miles. Per Family Handyman, this final check catches any settling that occurs during the first drive.
Pro Tip: Set up your tools in a single organized station before you lift the vehicle. Retrieving a forgotten torque wrench after the car is in the air adds time and creates unnecessary risk.
Which rotation pattern should you use?
Pattern selection depends on your drivetrain and tire type. Using the wrong pattern can accelerate wear rather than prevent it. Michelin notes that a brief settling period of minor noise or vibration is normal after rotation as tires adjust to new positions.

| Drivetrain / Tire Type | Recommended Pattern | Key Exception |
|---|---|---|
| Front-wheel drive (FWD) | Forward cross (fronts go straight back; rears cross to front) | Skip if tires are directional |
| Rear-wheel drive (RWD) | Rearward cross (rears go straight forward; fronts cross to rear) | Skip if tires are directional |
| AWD / 4WD | X-pattern (all four tires cross diagonally) | Check owner’s manual for AWD driveline limits |
| Staggered sizes (front ≠ rear) | Side-to-side only (left front to right front; left rear to right rear) | Cannot move front-to-back |
| Directional tires, same size | Front-to-back on the same side only | Never cross sides without dismounting and remounting |
A few additional rules worth knowing:
- A full-size, non-directional spare can be included in a five-tire rotation on RWD and 4WD vehicles, extending the life of all five tires.
- Directional tires have a tread pattern designed to rotate in one direction only. Moving them to the opposite side requires dismounting and remounting on a new rim, which adds cost and time.
- If your vehicle has staggered fitments, uneven tire wear is still manageable with consistent side-to-side swaps.
How long does each step take, and what does it cost?
Knowing where the time goes helps you plan a faster session or set realistic expectations before a shop visit.
| Stage | DIY Time Estimate | Shop Time Estimate |
|---|---|---|
| Setup and tool prep | 5–10 min | 2–3 min |
| Loosening lug nuts | 5–8 min | 2–4 min |
| Lifting and supporting | 5–8 min | 3–5 min |
| Swapping all four tires | 8–12 min | 5–10 min |
| Torquing and lowering | 5–8 min | 3–5 min |
| Pressure check and cleanup | 2–5 min | 1–3 min |
| Total | 30–45 min | 15–30 min |
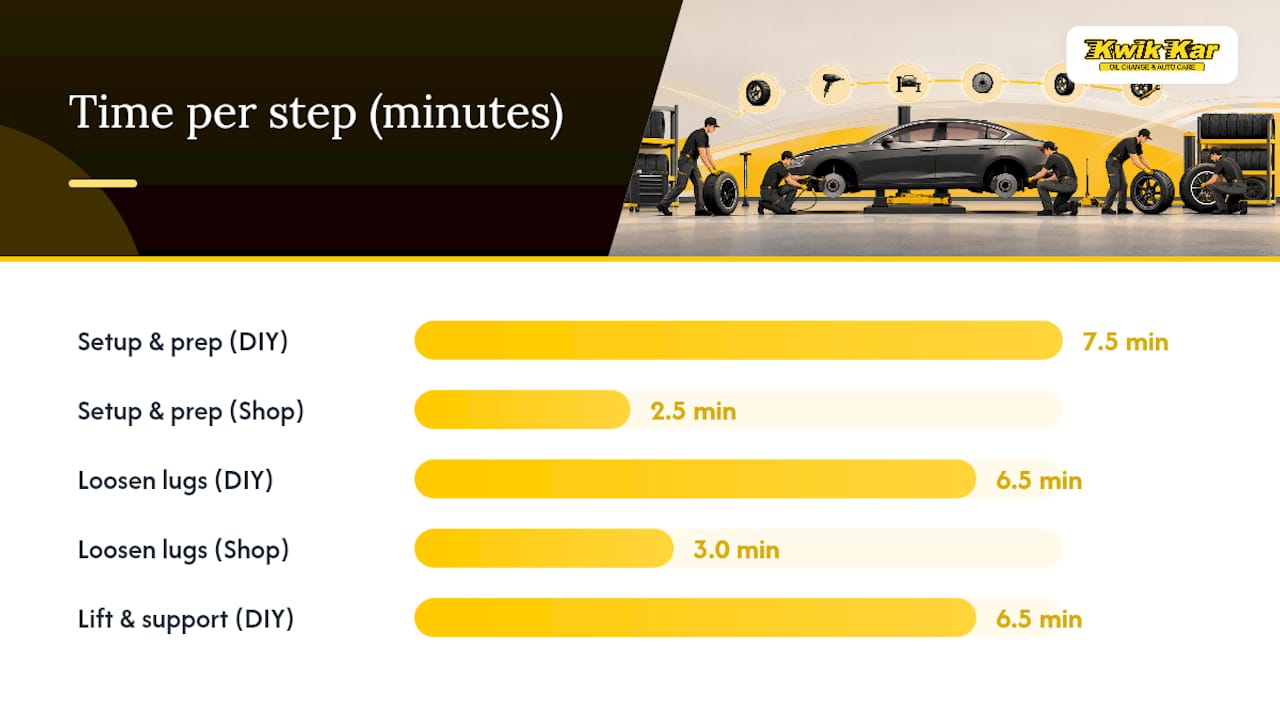
Per HowLongFor, shops typically finish rotations in 15–30 minutes, while DIY rotations run closer to 30–45 minutes. On cost: rotations often run free to roughly $50 depending on the provider. Many tire retailers bundle free rotations with a tire purchase, so check your purchase agreement before paying separately.
Essential tools checklist:
- Floor jack rated for your vehicle’s weight
- Four jack stands (matching the floor jack’s capacity)
- Breaker bar or impact wrench
- Calibrated torque wrench
- Correct lug socket size
- Wheel chocks (at least two)
- Tire pressure gauge
- Paint marker for position labeling
For a deeper look at rotation cost comparisons, including when bundled deals make professional service the smarter financial choice, the breakdown is worth reviewing before you decide.
What do technicians inspect during a rotation, and when should you call a pro?
A rotation is more than a swap. A trained technician uses the opportunity to catch problems that are invisible from the driver’s seat. According to AAA, professionals typically check TPMS sensors, valve stems, and brake components during the service, spotting irregular wear that can indicate alignment or suspension issues a DIYer might miss.
What a professional inspection covers:
- Tread depth on all four tires (below 2/32" is a legal safety threshold in most states)
- Uneven wear patterns that point to alignment, inflation, or suspension problems
- Sidewall damage: bulges, cuts, or cracking that compromise structural integrity
- Valve stem condition: cracked or corroded stems can cause slow leaks
- Wheel bearing play: detected by rocking the tire at 12 and 6 o’clock positions
- Brake pad and rotor condition: visible with the wheel removed
- TPMS sensor presence and function: some sensors require reprogramming after a rotation
Book a shop appointment instead of DIYing when you encounter:
- Seized or rounded lug nuts that won’t break loose safely
- Specialty or aftermarket wheels with non-standard lug patterns
- Mixed-size or staggered fitments requiring dismounting
- Persistent vibration or pulling after a recent rotation
- Suspected alignment issues (vehicle drifts, steering wheel is off-center)
For tire rotation and alignment concerns specifically, an ASE-certified technician can diagnose whether the issue is balance, alignment, or a worn suspension component. Chasing vibration with repeated DIY rotations without addressing the root cause wastes both time and tire life.
Your quick tire rotation checklist
Print this or save it to your phone before you start.
Before you begin:
- Confirm tire type (directional, non-directional, staggered) in the owner’s manual
- Check current inflation on all four tires and note the door placard spec
- Verify the spare is full-size and eligible for rotation (if using a five-tire pattern)
- Lay out all tools: jack, stands, torque wrench, chocks, gauge, marker
On the vehicle:
- Engage parking brake and chock stationary wheels
- Loosen lug nuts before lifting (tires still on ground)
- Lift one axle, place jack stands at factory lift points
- Mark each tire’s position before removal
- Swap per the correct pattern for your drivetrain
- Hand-start all lug nuts, then torque in a star pattern to spec
- Lower vehicle and do a final torque pass
- Check and adjust all four tire pressures
After your first drive (50–100 miles):
- Re-torque all lug nuts to manufacturer spec
- Listen for unusual noise or vibration; persistent symptoms need professional attention
- Recheck tire pressures if temperature has changed significantly
What Kwik Kar recommends about fast rotations
Speed matters, but not at the cost of the inspection that makes a rotation genuinely valuable. The owners who get the most from a rotation are the ones who treat it as a diagnostic opportunity, not just a swap. A fast rotation done without checking tread depth, brake condition, or TPMS function is a missed chance to catch a $30 problem before it becomes a $300 one.

Kwik Kar Oil Change & Auto Care’s position is straightforward: most vehicle owners benefit from at least occasional professional rotations, even if they handle some maintenance themselves. Lifted equipment, calibrated torque tools, and trained eyes on the brakes and suspension add a layer of protection that a driveway jack setup simply cannot replicate. The wheel alignment vs. tire balance question is a good example: owners often assume vibration after a rotation means the swap was done wrong, when the real cause is a balance or alignment issue that only shows up once the tires move to new positions.
Transparent estimates before any work begins, combined with ASE-certified technicians who use calibrated equipment, mean you know exactly what the service covers and what it costs before the first lug nut turns.
Kwik Kar Oil Change & Auto Care handles your rotation fast
Skipping the DIY setup entirely is often the faster, safer choice. At Kwik Kar Oil Change & Auto Care, ASE-certified technicians complete four-tire rotations in the 15–30 minute window, with calibrated torque equipment, a full inspection of brakes and TPMS, and transparent pricing before the work starts.

Weekday mornings typically offer the shortest wait times. Rotations are frequently bundled with oil changes and other preventive services, so combining appointments saves you a return trip. Check current promotions and book your tire service online or by phone. If the rotation reveals a balance or alignment concern, the same team handles it on the spot, no second appointment needed.
Sources
- How Often Should You Rotate Your Tires? – Consumer Reports
- Tire rotation – Bridgestone Tires
- How Long Does a Tire Rotation Take? (Shop & DIY) | HowLongFor
- Everything to Know About Tire Rotations, Explained – Family Handyman
- Tire Rotation: Vehicle Types & Care – Michelin USA
FAQ
How long does a tire rotation actually take?
A shop rotation typically takes 15–30 minutes; a DIY rotation with proper tools and setup usually takes 30–45 minutes. Seized lug nuts, specialty wheels, or TPMS reprogramming can add time at either setting.
Do you really need to rotate tires every 5,000 miles?
The standard range is every 5,000–8,000 miles, but your owner’s manual and tire warranty are the definitive references. Driving style, load, and drivetrain all affect how quickly tires wear unevenly.
Do you need to do anything after rotating tires?
Yes. Check and adjust tire pressures immediately after the rotation, then re-torque all lug nuts to the manufacturer’s specification after your first 50–100 miles of driving. Bridgestone specifically recommends this re-torque as a standard post-rotation step.
Is tire rotation urgent if you’re past the mileage interval?
Not an emergency, but don’t delay it significantly. Tires that go too long without rotation develop uneven wear patterns that can become permanent, reducing traction and shortening overall tire life.
When should you skip DIY and go to a shop?
Book a professional when you have seized lug nuts, staggered or directional tires requiring dismounting, suspected alignment issues, or persistent vibration after a rotation. Kwik Kar Oil Change & Auto Care’s ASE-certified technicians can diagnose and address those issues in the same visit.